September 25, 2019

More Inspiration from the MFT Vault!


Hello and welcome back! Today I have another card to share featuring some of the new products that just came out of the MFT Vault! I am loving seeing what older products will make a return each month - so exciting!

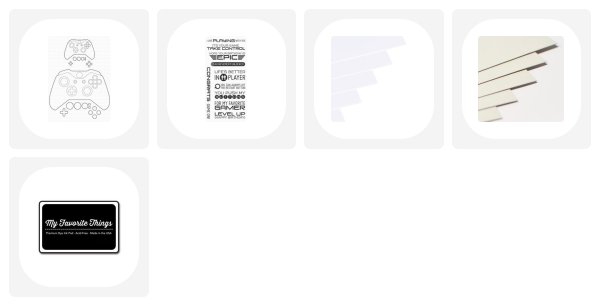
For my card today I sed the Game Controller Die-namics along with the Level Up stamp set to create a card perfect for the gamer in your life.

I die cut the controller from Grout Gray card stock and then I die cut all the buttons from white so I could customize the colours with my Copic markers. I glued them all on once they were coloured and then I covered them all with clear glaze to make them look shiny and dimensional.

I used Distress Inks and created a striped design on the card base with colours similar to the ones I used on the controller. I adhered the controller with foam adhesive, added a cord at the top and stamped the sentiment in black ink directly underneath.

Thanks so much for stopping by today. You can see even more inspiration using the new Vault products on the MFT blog.

Supplies:

September 24, 2019

MFT September Vault Release


Hello, and welcome back! Today we're releasing a handful of products straight from the MFT Vault - I love the products making a return and couldn't wait to use them on my cards!

For my card today I used the Miss You a Latte stamp set along with the Gift Card Shaker Window to create a Starbuck's inspired card perfect to send to a coffee-loving friend. :)

I coloured my image with Copic markers and added green and white details to the cups to make them look like Starbuck's cup. I had the perfect gift card to use with the design, so I added that using the Gift Card Shaker Pouch, with a few sequins added in for a little sparkle and shine.

I stamped a sentiment from the Cup of Love stamp set into Gravel Gray card stock and die cut it using the Skinny Strips Die-namics. I adhered the sentiment strip and stamped image to the gift card pouch and finished the design with some additional sequins.

Make sure to head to the MFT Blog for a look at all of the Vault products releasing this month.
Thanks for stopping by!

Supplies:

September 11, 2019

MFT WSC 454


Hello and welcome back! Today I have a card to share for the latest MFT sketch challenge.

For my card today I used the new Café All Day Die-namics and paired it with the cute bear image from the Sweater Weather in the Woods stamp set to create a coffee-themed card.


I used the coordinating shaker pouches and created a shaker card and added a coffee sleeve over top with a stamped sentiment from the Perk Up stamp set. I love how perfectly it fits in that space. I also stamped the Knitted Sweater background at the bottom of the card instead of creating the vertical stripes on the sketch design.


I stamped out the bear image with Extreme Black ink and coloured him in with Copic markers. I am really loving these shades of green lately, which are YG61, G24 and G85. Once I had him all coloured, I die cut him and adhered him to the front of the card with foam adhesive. 

Thanks so much for joining me for this week's sketch challenge. Make sure to check it out on the MFT blog and enter your card for a chance to win!

Supplies:

September 03, 2019

September 2019 | MFT & Friends


Hello and welcome to the September Release New Product Launch! All of the new products we've been sharing for the past five days are available NOW at My Favorite Things!

For my card today I used the new Cafe All Day Die-namics to create a holiday set of tags and a card.


These were so quick and easy to create with a strip of card stock and a couple of square dies to create the belt buckle. I embossed a holiday design on Wild Cherry card stock and then I die cut it with the base of the coffee cup for the two tags. I added the black card stock strip and gold sparkle belt buckle to make them look like Santa's suit and then I created 2 tag designs.


For the card design, I used the coordinating shaker pouches and made a shaker coffee cup with the same Santa suit design. You can see how I created these tags and card in today's video on the MFT YouTube channel HERE.

Thanks so much for joining me for September release product launch! Make sure to head over to the MFT blog for a closer look at the new products and more ideas using them.

Supplies:

September 02, 2019

MFT September Release Countdown - 1 More Day to Go


Hello, and welcome! We have 1 more day until the MFT September release is available and we have more great products to share! For the next five days, we'll be sharing cards and projects featuring all of the new products coming out on September 3 at 10am EDT.

For my cards today, I used the new All the Stars Cover-Up Die-namics and created 2 card designs with one die cut panel.

I created a colourful rainbow panel with Distress inks and then die cut the star design from the inked panel. I used the full die cut piece as a template to place all of the loose stars onto a card base with foam adhesive, and then I added it to a second card base.


You can see how I created both cards from start to finish on the MFT YouTube channel today.

Thanks so much for joining me today. Make sure to head over to the MFT Blog for a closer look at the new products and more ideas using them.

See you tomorrow for the September release!
Supplies:

September 01, 2019

Are You Ready? 2 More Days Until the September Release from MFT!


Hello, and welcome! We have 2 more days until the MFT September release is available and we have more great products to share! For the next five days, we'll be sharing cards and projects featuring all of the new products coming out on September 3 at 10am EDT.

For my card today, I used the new Favorite Teacher stamp set and of course when I saw it, I immediately thought of Harry Potter LOL! :) I stamped the image onto a white card stock panel and coloured it in with Copic markers to look like Harry.


I then added some brick detail to the background and also added some die cut stars and drops of silver Stickles to go with his wand and make it look magical. I stamped the sentiment onto Steel Grey card stock and die cut it with a Stitched Fishtail die. I used Berrylicious for the blue accents on the card and adhered the finished panel to a Steel Grey card base.


Thanks so much for joining me today. Make sure to head over to the MFT Blog for a closer look at the new products and more ideas using them.

See you tomorrow for more countdown fun!
Supplies: